Notifications
Configure Push and In-app notifications.
All the public APIs in the SDK should be called after initializing the SDK via Helpshift installWithPlatformId API
Configure push notifications via Helpshift
Notifications can be sent to your users when you reply to an issue submitted by them. In addition to the expected Push Notification behavior on iOS, you can customize your notifications to display a numbered badge on your App icon or play a sound alert when a notification is received.
If your app does not already use push, you will need to enable push for your app. To enable push notification in your application you need to add APNS registration code to your AppDelegate's application:didFinishLaunchingWithOptions: method:
- Objective-C
- Swift
- (BOOL) application:(UIApplication *)application didFinishLaunchingWithOptions:(NSDictionary *)launchOptions {
    ...
    UNUserNotificationCenter *center = [UNUserNotificationCenter currentNotificationCenter];
    center.delegate = self;
    [center requestAuthorizationWithOptions:(UNAuthorizationOptionBadge | UNAuthorizationOptionSound | UNAuthorizationOptionAlert)
                                                                    completionHandler:^(BOOL granted, NSError *_Nullable error) {
        ...
    }];
    [UIApplication sharedApplication registerForRemoteNotifications];
    ...
}
func application(_ application: UIApplication,
                didFinishLaunchingWithOptions options: [UIApplication.LaunchOptionsKey : Any]? = nil) -> Bool {
    let center = UNUserNotificationCenter.current()
    center.delegate = self
    center.requestAuthorization(options: [.badge, .sound, .alert]) { granted, error in
        if let error = error {
            NSLog("Error while requesting notification permissions: \(error.localizedDescription)")
        }
    }
}
Configure Helpshift's push notification service in the Helpshift admin interface
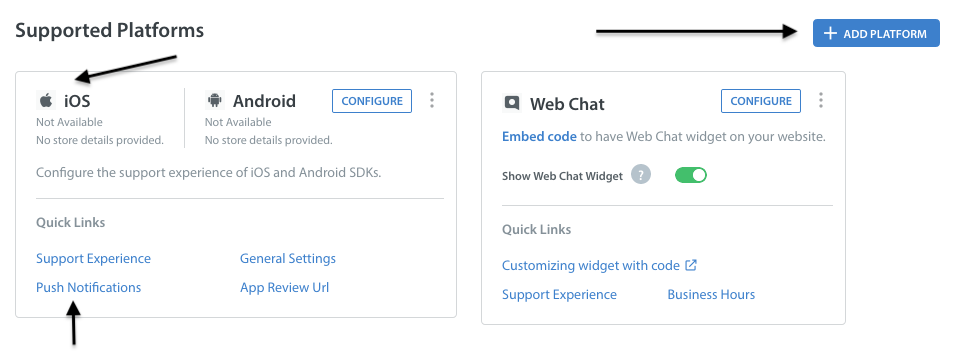
To enable the Helpshift system to send push notifications to your users you will have to add iOS as a platform in your app (if you have not added already). And then click on the push notifications option.
In order to send push notifications to all iOS mobile apps and games, you need to establish an authenticated connection with the Apple Push Notification Servers (APNs). There are two methods you can use to authenticate:
- The newer token-based method (.p8)
- The older certificate-based method (.p12)
Token-based method (.p8)
The token-based method is faster because it offers a stateless way to communicate with APNs. It doesn't require APNs to look up the certificate or any other information related to the provider server.
We now support the newer token-based .p8 key method, which allows you to send notifications to all your iOS apps and games using a single key. You can generate your .p8 key through your Apple developer account, as explained here.
Here are the steps to configure iOS push notifications using .p8 keys:
Go to Settings, then navigate to the APP SETTINGS section to choose the app you want to configure.
On the App settings page, click on the CONFIGURE option next to In-app SDK.
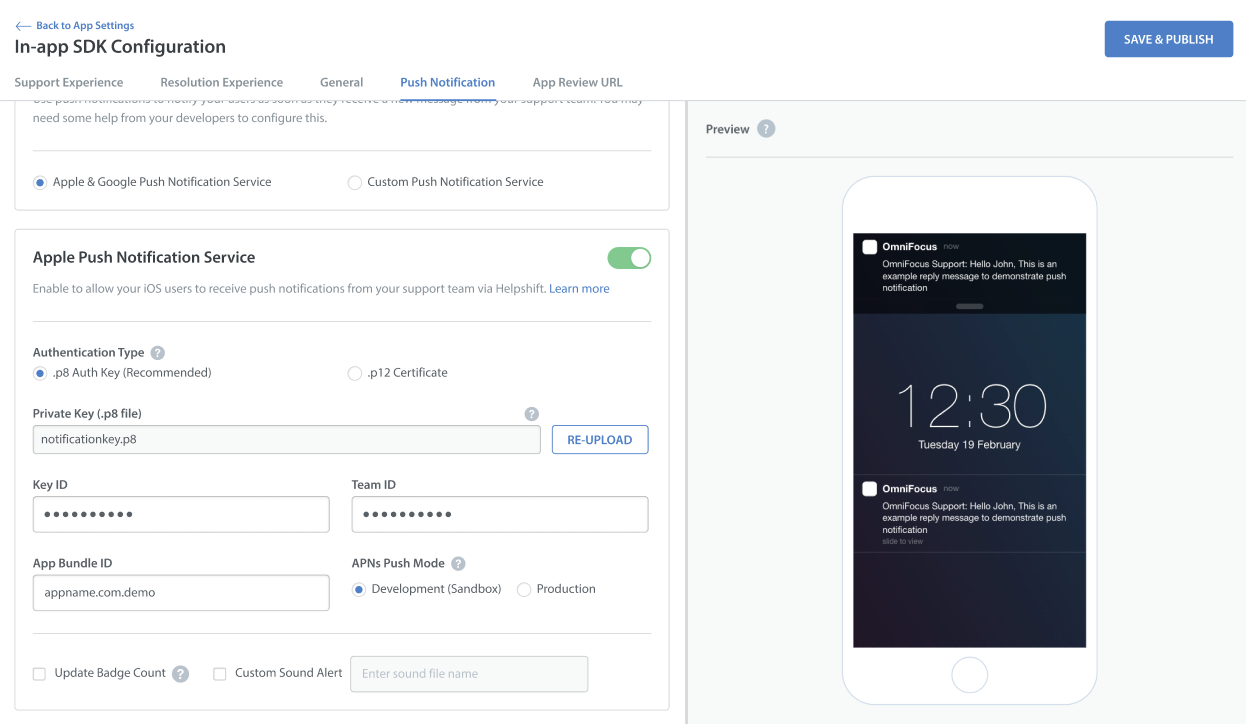
On the In-app SDK Configuration page, navigate to the Push Notification section.
Enable the toggle for Apple Push Notification Service if not enabled. The app selects the p8 key authentication type by default when you enable the toggle for the first time.
Upload the p8 key and fill in all the required details.
Select the APNs push mode (Development/Production).
Click on Save & Publish to save the changes.
Certificate-based method (.p12)
You need to generate certificates for APNS on Apple's portal that you can later provide to Helpshift. This lets Helpshift send push notifications to your users. Apple has moved away from old type of certificates to Apple Push Notification service SSL. There is another option to create Apple Push Notification Authentication Key, but Helpshift does not support this option yet. It's also possible that you still have the old type of certificate that has not yet expired, this is also supported by Helpshift.
Apple provides two variations of Apple Push Notification service SSL
- Apple Push Notification service SSL (Sandbox)
- Apple Push Notification service SSL (Sandbox & Production)
After creating your certificate, download it. Double click on it to import it to the Keychain Access application. In the Keychain Access application, right click on the certificate that was just added, and click export it in .p12 format. Please provide a password while exporting the certificate since we do not accept empty passwords. (Note that if your development private key is not present in Keychain Access, you will not be able to export it in .p12 format.)
After export, login and upload the .p12 file in your app in the Helpshift admin panel. Provide the same password you used while exporting to .p12 format.
Please note that you need to use the same bundle identifier in the app as the one you used to create the APNS certificate.
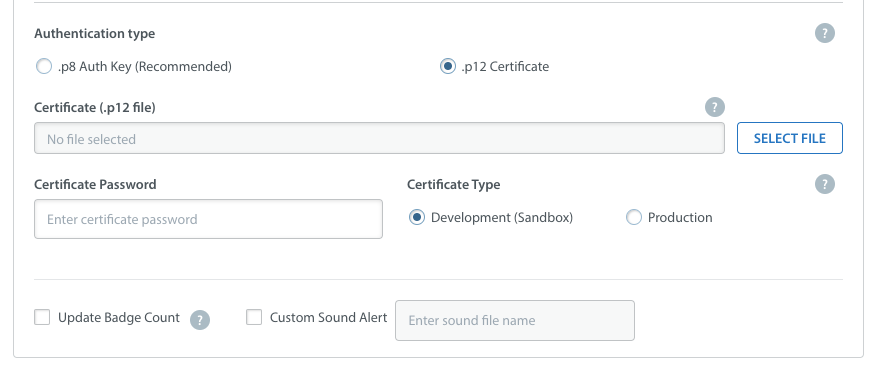
You can configure whether to send a badge or not, and sound alerts if you provided custom sounds bundled with your app to handle notifications. Save it and you're all set.
Development (Sandbox) mode vs. Production mode
When you build and run your app from Xcode, it is in development (Sandbox) mode. To test push notifications from Helpshift in this mode make sure you choose 'Development Mode' while uploading either of the above two certificate types.
When you publish your app and download from App Store, your app is in Production mode. To test push notifications from Helpshift in production mode make sure you choose 'Production Mode' while uploading a certificate of 'Apple Push Notification service SSL (Sandbox & Production)' type. Sandbox mode certificate will not work on a production environment.
We do not support using the same certificate for both sandbox and production apps. In these cases we recommend you create two separate apps on our dashboard, one in 'Production mode' and the other in 'Development mode'. While testing please use the credentials of the developement mode app. When you are ready to publish, please replace the credentials with those of the production level app.
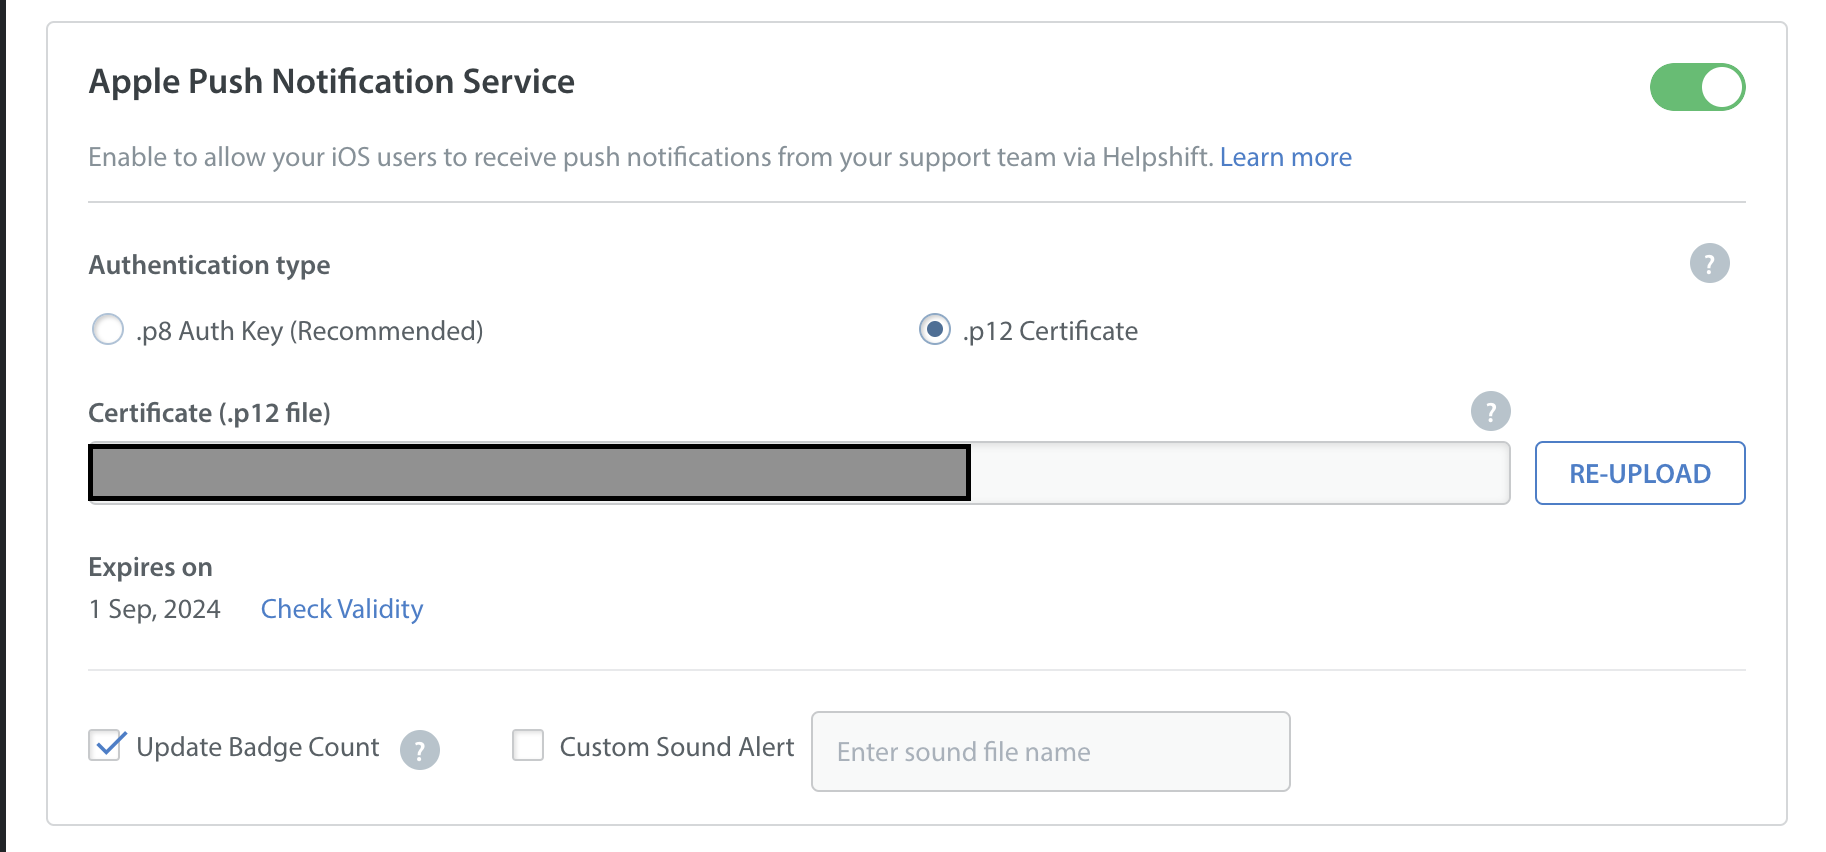
Your Push Certificate has an expiry date, as indicated in the below screenshot. Helpshift will not send you a reminder when your Push Certificate expires, so please make sure that your developer keeps a tab on the expiry date to reupload the Push Certificate.
Configure the Helpshift iOS SDK to handle notifications
When push is not configured, Helpshift SDK shows out-of-the-box "in-app notifications" for every message sent by Agents/Bots.
You should call registerDeviceToken API only after you have configured the Helpshift dashboard for push notifications. Calling the registerDeviceToken API without configuring the Helpshift dashboard will stop showing out-of-the-box "in-app notifications" for the end users.
For Helpshift SDK to work with the Helpshift push notification service
you will need to invoke the registerDeviceToken: api call inside the application delegate method
application:didRegisterForRemoteNotificationsWithDeviceToken:
In your app delegate file it will look something like this:
- Objective-C
- Swift
- (void) application:(UIApplication *)application didRegisterForRemoteNotificationsWithDeviceToken:(NSData *)deviceToken {
    [Helpshift registerDeviceToken:deviceToken];
}
func application(_ application: UIApplication, didRegisterForRemoteNotificationsWithDeviceToken deviceToken: Data) {
    Helpshift.registerDeviceToken(deviceToken)
}
If your app uses UNNotification framework
To respond to the delivery of notifications, you must implement a delegate for the shared UNUserNotificationCenter object. Your delegate object must conform to the UNUserNotificationCenterDelegate protocol, which the notification center uses to deliver notification information to your app:
- If a notification arrives while your app is in the foreground, UNUserNotificationCenterDelegate's
userNotificationCenter:willPresentNotification:withCompletionHandler:is called. - The system does not call the
userNotificationCenter:willPresentNotification:withCompletionHandler:method when your app is in the background or is not running. In those cases, the system alerts the user according to the information in the notification itself. When the user selects an action from the notification interface, the system notifies your app of the user's choice. To receive responses, your delegate object must implement theuserNotificationCenter:didReceiveNotificationResponse:withCompletionHandler:method.
In all of the above cases, you should check the "origin" field of the notification dictionary and call handleNotificationWithUserInfoDictionary:isAppLaunch: API if the origin of the notification is "helpshift". The Helpshift SDK will check Issues for which the notifications were received and will launch the Conversation screen for those Issues automatically. The isAppLaunch boolean flag here is used to distinguish between an active or backgrounded app vs. an app that was killed by the user. In the latter case, this flag should be set to true.
Example usage:
For the userNotificationCenter:willPresentNotification:withCompletionHandler: delegate -
- Objective-C
- Swift
- (void) userNotificationCenter:(UNUserNotificationCenter *)center
    willPresentNotification:(UNNotification *)notification
    withCompletionHandler:(void (^)(UNNotificationPresentationOptions options))completionHandler {
    if([[notification.request.content.userInfo objectForKey:@"origin"] isEqualToString:@"helpshift"]) {
        [Helpshift handleNotificationWithUserInfoDictionary:notification.request.content.userInfo
                                                isAppLaunch:false];
        completionHandler(UNNotificationPresentationOptionNone);
    } else {
        // Handling for non-helpshift push notifications received when app is in foreground
    }
}
func userNotificationCenter(_ center: UNUserNotificationCenter, willPresent notification: UNNotification, withCompletionHandler completionHandler: @escaping (UNNotificationPresentationOptions) -> Void) {
    if notification.request.content.userInfo["origin"] as? String == "helpshift" {
        Helpshift.handleNotification(withUserInfoDictionary: notification.request.content.userInfo, isAppLaunch: false)
        completionHandler([])
    } else {
        // Handling for non-helpshift push notifications received when app is in foreground
    }
}
For the userNotificationCenter:didReceiveNotificationResponse:withCompletionHandler delegate -
- Objective-C
- Swift
- (void)userNotificationCenter:(UNUserNotificationCenter *)center
didReceiveNotificationResponse:(UNNotificationResponse *)response
         withCompletionHandler:(void (^)(void))completionHandler {
    if([[response.notification.request.content.userInfo objectForKey:@"origin"] isEqualToString:@"helpshift"]) {
        [Helpshift handleNotificationWithUserInfoDictionary:response.notification.request.content.userInfo
                                                isAppLaunch:YES];
    } else {
        // Handling for non-helpshift push notifications received when app is in background or killed
    }
    completionHandler();
}
func userNotificationCenter(_ center: UNUserNotificationCenter, didReceiveNotificationResponse response: UNNotificationResponse, withCompletionHandler completionHandler: @escaping () -> Void) {
    if response.notification.request.content.userInfo["origin"] as? String == "helpshift" {
        Helpshift.handleNotification(withUserInfoDictionary: response.notification.request.content.userInfo, isAppLaunch: true)
    } else {
        // Handling for non-helpshift push notifications received when app is in background or killed
    }
    completionHandler()
}
Badge count
If you need to handle badge reset in the application icon, you can do
something like below in the applicationDidBecomeActive: delegate
method:
- (void)applicationDidBecomeActive:(UIApplication *)application
{
    [[UIApplication sharedApplication] setApplicationIconBadgeNumber:0];
}
- To test Push Notifications for an app that is already in production please refer to this.
- You should check the origin and call the
handleRemoteNotficationas soon as you get the callback. SDK checks the state of the app (Active / Inactive) and based on it, decides to show chat screen or in-app notification. Delay in calling handleRemoteNotification could result in SDK to get inaccurate application state. - If you are using Xcode 11 for building and deploying your app, please refer to our troubleshooting guide
In-app notifications
In-app notifications are similar to Apple's push notification banners. Unlike push notifications, they appear within your app when it is in use by the user.
These notifications are sent when an agent replies to a customer's issue. Your customers can click on these banners to go straight into the conversation screen.

Configuring In-app notifications
The Helpshift install call supports flags for configuring SDK behaviour.
Currently we support one flag i.e enableInAppNotification.
Enabling/Disabling In-app notifications
| Flag | enableInAppNotification |
| Values | YES/NO |
| Default | YES |
If you do not want the in-app notifications support provided by the
Helpshift SDK, please set this flag to NO. The default value of this
flag is YES i.e in-app notifications will be enabled.
Read more about in-app notifications in the Notifications section.
Example:
- Objective-C
- Swift
NSDictionary *config = @{ @"enableInAppNotification": @YES };
[Helpshift installWithPlatformId:@"YOUR_PLATFORM_ID"
                          domain:(NSString *)domain
                          config:@"YOUR_DOMAIN" config:config];
let config = ["enableInAppNotification" : true]
Helpshift.install(withPlatformId: "YOUR_PLATFORM_ID", domain: "YOUR_DOMAIN", config: config)
Pausing In-app notifications
If you have enabled in-app notifications, use the API pauseDisplayOfInAppNotification to pause/resume the notifications. When YES is passed to this method, display of in-app notifications is paused even if they arrive. When you pass NO, the in-app notifications start displaying.
Example:
- Objective-C
- Swift
[Helpshift pauseDisplayOfInAppNotification:YES]; // To temporarily pause in-app notifications
[Helpshift pauseDisplayOfInAppNotification:NO]; // To resume showing the in-app notifications
Helpshift.pauseDisplayOf(inAppNotification: true) // To temporarily pause in-app notifications
Helpshift.pauseDisplayOf(inAppNotification: false) // To resume showing the in-app notifications
Notification badges
If you want to show your user notifications for replies you send to the
issues they posted, you can use notification counts provided by
Helpshift SDK that gives you the total number of unread messages and
display it as a badge. You can get notification counts asynchronously by
implementing the HelpshiftDelegate in your respective .h and .m
files. Notifications are typically displayed as badges
inside your app where a user invokes the help section. These badges can
be displayed anywhere in your app's interface to tell the user that they
have unread replies/messages from you. For example to display a badge on
a view (lets say its called yourView which can set its textLabel) while
you are polling for notifications using:
[Helpshift requestUnreadMessageCount:YES];
You can implement something like the following in the notification count delegate method:
- Objective-C
- Swift
- (void) handleHelpshiftEvent:(NSString *)eventName withData:(NSDictionary *)data {
    ...
    if([eventName isEqualToString:HelpshiftEventNameReceivedUnreadMessageCount]) {
        int count = [data[HelpshiftEventDataUnreadMessageCount] intValue];
        BOOL fromCache = [data[HelpshiftEventDataUnreadMessageCountIsFromCache] boolValue];
        NSLog(@"Unread count: %d", count);
        NSLog(@"Is unreadCount served from local cache : %d", fromCache);

        dispatch_async(dispatch_get_main_queue(), ^{
            [yourView setTextLabel:[NSString stringWithFormat:@"%d",count];
        });
    }
}
func handleHelpshiftEvent(_ eventName: String, withData data: [AnyHashable : Any]?) {
    if eventName == HelpshiftEventNameReceivedUnreadMessageCount {
        guard let data = data else { return }
        let count = data[HelpshiftEventDataUnreadMessageCount] as? Int
        let isFromCache = data[HelpshiftEventDataUnreadMessageCountIsFromCache] as? Bool
        print("Count: \(count), fromCache: \(isFromCache)")

        DispatchQueue.main.async {
            yourLabel.text = "\(count)"
        }
    }
}
Similarly for a UITabBarItem in the notification count delegate method
you can implement something like:
- Objective-C
- Swift
- (void) handleHelpshiftEvent:(NSString *)eventName withData:(NSDictionary *)data {
    ...
    if([eventName isEqualToString:HelpshiftEventNameReceivedUnreadMessageCount]) {
        int count = [data[HelpshiftEventDataUnreadMessageCount] intValue];
        BOOL fromCache = [data[HelpshiftEventDataUnreadMessageCountIsFromCache] boolValue];
        NSLog(@"Unread count: %d", count);
        NSLog(@"Is unreadCount served from local cache : %d", fromCache);

        dispatch_async(dispatch_get_main_queue(), ^{
            tabBarItem.badgeValue = [NSString stringWithFormat:@"%d",count];
        });
    }
}
func handleHelpshiftEvent(_ eventName: String, withData data: [AnyHashable : Any]?) {
    if eventName == HelpshiftEventNameReceivedUnreadMessageCount {
        guard let data = data else { return }
        let count = data[HelpshiftEventDataUnreadMessageCount] as? Int
        let isFromCache = data[HelpshiftEventDataUnreadMessageCountIsFromCache] as? Bool
        print("Count: \(count), fromCache: \(isFromCache)")

        DispatchQueue.main.async {
            tabBarItem.badgeValue = "\(count)"
        }
    }
}
These will update your view or UITabBarItem whenever a new notification
arrives in the delegate method. The situation can vary depending upon
your app UI. Showing notification counts at appropriate places would help
you draw in your users so that you can engage them more in conversations
and hence solve their problems better. To display the notification
count of unread messages stored locally to your users, you can call requestUnreadMessageCount:
- Objective-C
- Swift
[Helpshift requestUnreadMessageCount:NO]
Helpshift.requestUnreadMessageCount(false)
to retrieve the unread messages count stored locally and display the unread count similar to mentioned in the above examples.
Refer Unread Message Count Event for knowing more on how the SDK notifies of the unread count to your app.