Getting Started
Requirements
- Xcode 16.0 and above
- Cocoapods v1.10.0
- Supported iOS versions:
- iOS 15 and above
- For details regarding Helpshift SDK's iOS support policy, please refer to this article.
Automated Integration using Cocoapods
To start using SDK X v10.5.0 in your project, add the following line to your Podfile:
pod 'HelpshiftX', '10.5.0'
And run pod install or pod update to refresh your cocoapods dependencies.
You can now move on to Initializing Helpshift in your App.
Automated Integration using Swift Package Manager
To start using Helpshift v10.5.0 in your SPM project, add the following package URL to your project's "Package Dependencies" section
https://github.com/helpshift/HelpshiftX
For version rules, we recommend using either "Exact" or "Up to Next Minor" and manually updating the version number when a major version of Helpshift SDK X is released.
You can now move on to Initializing Helpshift in your App.
Manual Integration
Get the latest SDK zip
Download the latest Helpshift iOS SDK.
The zip file contains:
| HelpshiftX.xcframework | The HelpshiftX framework |
| NOTICE.txt | License information about third-party code. |
Non-bitcode build of SDK X
Since bitcode has been deprecated by Apple starting Xcode 14, SDK X builds don't contain bitcode starting from 10.3.0 release.
Add the latest stable SDK release to your project
- Unzip the SDK, and drag-and-drop
HelpshiftX.xcframeworkinto your Xcode project - In the
Generalsection of your app target, verify that theHelpshiftX.xcframeworkis present in theFramework, Libraries, and Embedded Contentsection with the optionEmbed and Signselected from the Embed options dropdown.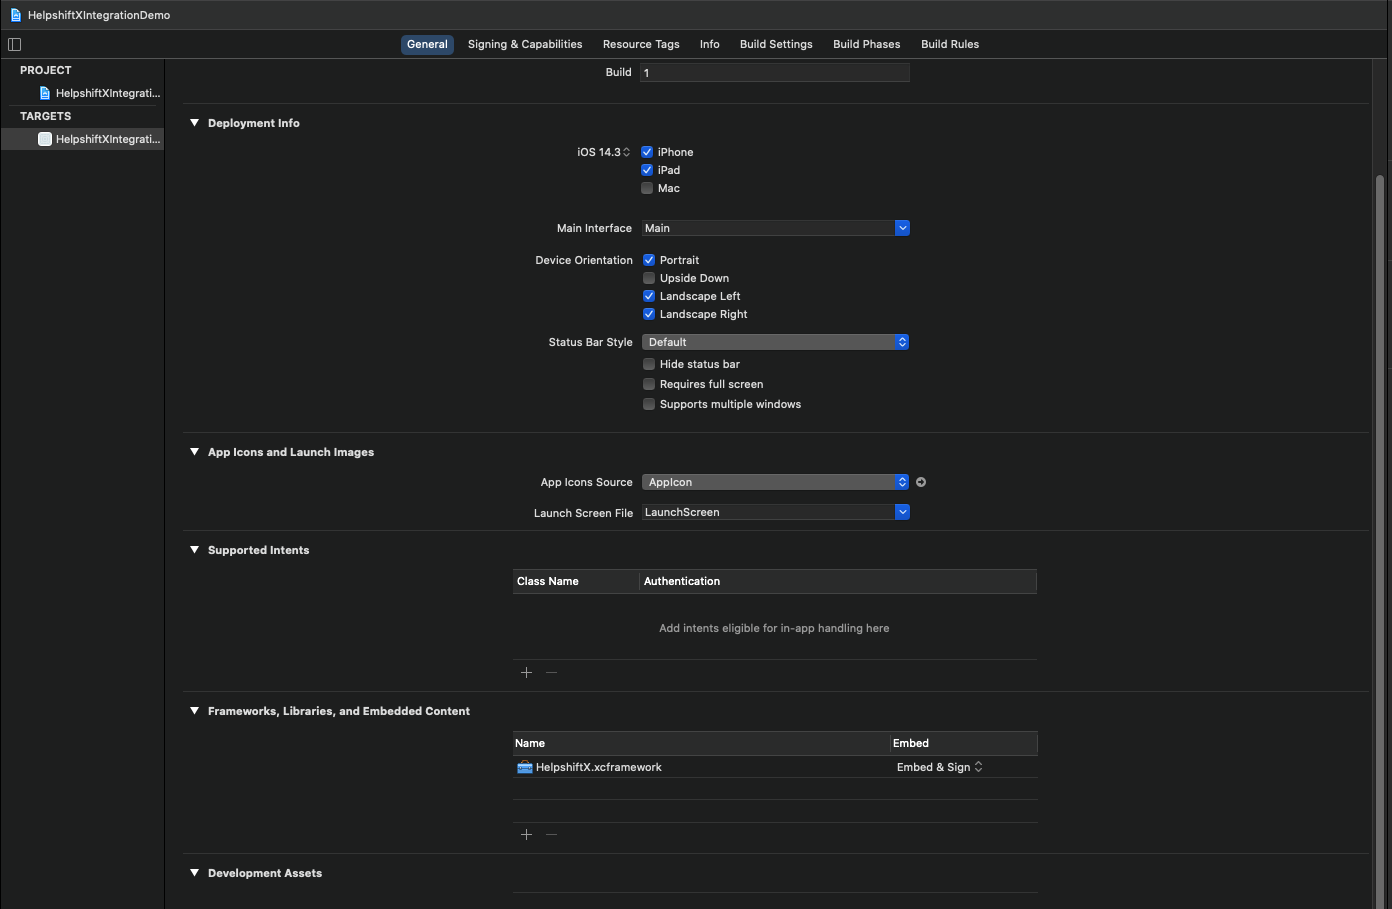
- After successful integration,
Build Phasesshould look like this: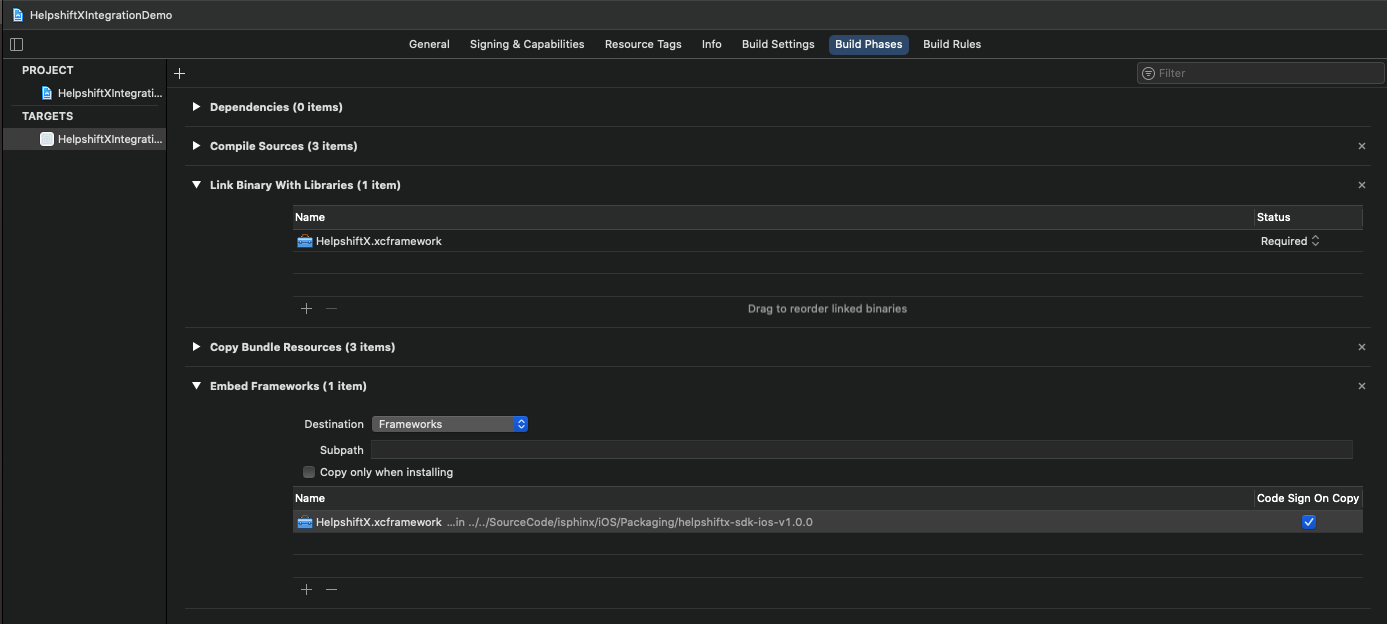
Add NSPhotoLibraryUsageDescription key in your application's info.plist file
If your app does not use this permission, you would need to add this key as well as description for the same. Not adding this key-description pair might cause app rejection.
NSPhotoLibraryUsageDescription Description text: "We need to access photos library to allow users manually pick images meant to be sent as attachment for help and support reasons."
The following instructions apply only to versions below SDK X 10.2.0.
Along with NSPhotoLibraryUsageDescription (as mentioned above), also add NSCameraUsageDescription and NSMicrophoneUsageDescription key in your application's info.plist file
If your app does not use this permission, you would need to add this key as well as description for the same. Not adding this key-description pair might cause app rejection.
NSCameraUsageDescription Description text: "We need to access the camera to allow users to click images meant to be sent as an attachment for help and support reasons."
NSMicrophoneUsageDescription Description text: "We need to access the microphone to allow users to record and send videos meant to be sent as an attachment for help and support reasons."
Note that this is just a suggested description. If you need localisations for the same, please Contact Us
Start using Helpshift
Helpshift is now integrated in your app and ready to collect meaningful data about your users.
Initializing Helpshift in your app
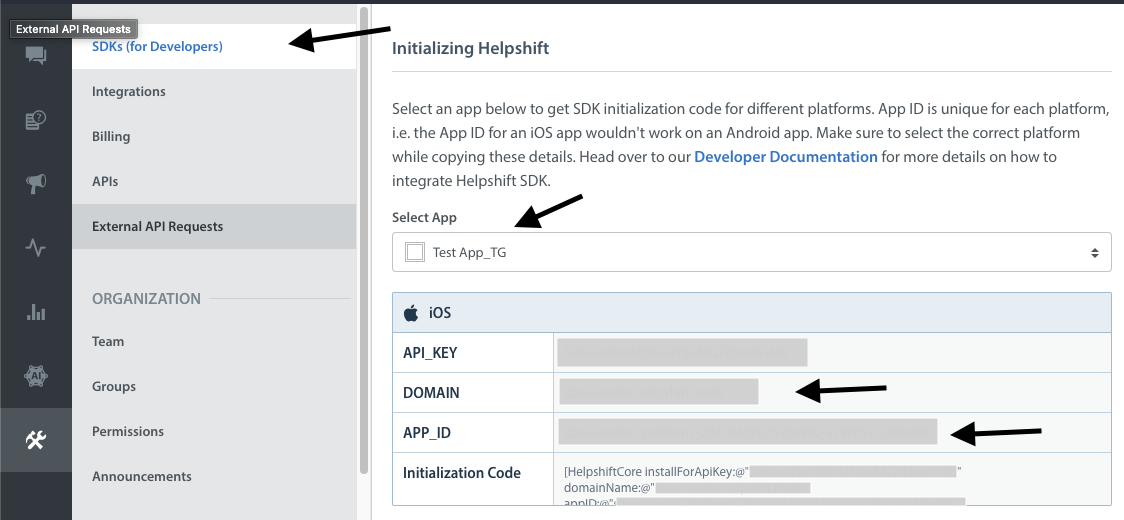
First, create an app on the Helpshift Dashboard
Create an app with iOS as a selected
Platform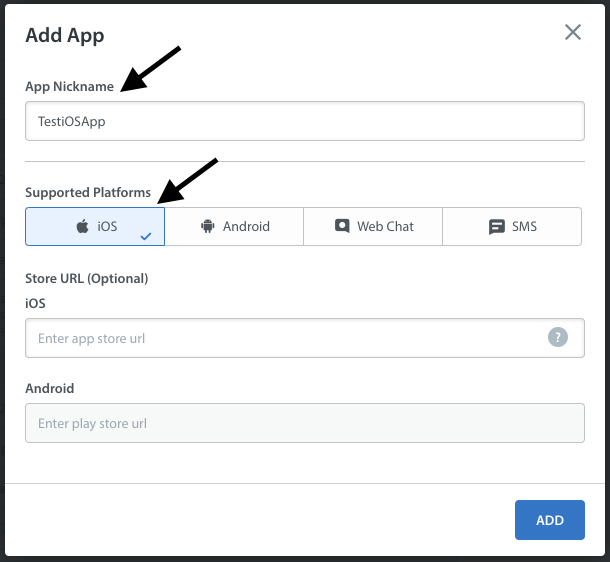
Helpshift uniquely identifies each registered App using a combination of 2 tokens.
Platform ID | Your App's unique platform id (App's Platform Id on dashboard is your platform Id) |
Domain Name | This is your Helpshift domain name e.g. happyapps.helpshift.com |
To obtain these values:
- Go to your Helpshift dashboard
- Navigate to
Settings>SDKs (for Developers) - Select your App and from the dropdowns
- Copy the two tokens present in the "iOS" table
Initialize the SDK by calling installWithPlatformId: method.
You can optionally pass the configuration dictionary to installWithPlatformId: API. To see supported configurations, check the SDK Configuration page.
- Objective-C
- Swift
@import HelpshiftX;
...
- (BOOL)application:(UIApplication *)application didFinishLaunchingWithOptions:(NSDictionary *)launchOptions
{
    ...
    NSDictionary *config = @{} // Your config
    [Helpshift installWithPlatformId:@"YOUR_APP_ID"
                              domain:@"YOUR_DOMAIN"
                              config:config];
    ...
    return YES;
}
import HelpshiftX
...
    func application(_ application: UIApplication, didFinishLaunchingWithOptions launchOptions: [UIApplication.LaunchOptionsKey: Any]?) -> Bool {
        ...
        let config = [String:String]() // Your config
        Helpshift.install(withPlatformId: "YOUR_PLATFORM_ID", domain: "YOUR_DOMAIN", config: config)
        ...
        return true
    }
...
Initializing Helpshift in your app for China
A special install config key, isForChina, should be used for integrating Helphift SDK for China region.
This config key accepts a boolean value. Pass true if you are integrating the SDK in an app for China region. The value defaults to false if left unspecified.
Add the following code in your AppDelegate class -
- Objective-C
- Swift
@import HelpshiftX;
...
- (BOOL) application:(UIApplication *)application didFinishLaunchingWithOptions:(NSDictionary *)launchOptions
{
    ...
    NSDictionary *config = @{
        ...
        @"isForChina" : @YES,
        ...
    };
    [Helpshift installWithPlatformId:@"YOUR_PLATFORM_ID" domain:@"YOUR_DOMAIN" config:config];
    ...
    return YES;
}
import HelpshiftX
...
    func application(_ application: UIApplication, didFinishLaunchingWithOptions launchOptions: [UIApplication.LaunchOptionsKey : Any]? = nil) -> Bool {
        ...
        let config = [
            ...
            "isForChina": true
            ...
        ]
        Helpshift.install(withPlatformId: "YOUR_PLATFORM_ID", domain: "YOUR_DOMAIN", config: config)
        ...
        return true
    }
...
Placing the install call
You should not place the install call anywhere other than application:didFinishLaunchingWithOptions:
Placing it elsewhere might cause unexpected runtime problems.
Helpshift install call will throw InstallException in case the validation of the SDK keys fail.