Getting Started iOS
Getting Started iOS
Cocos2d-x plugin for Helpshift SDK helps you utilize Helpshift from your game's C++ codebase.
Requirements
- Xcode 12.0 and above.
- Supported iOS versions:
- iOS 15, 14, 13, 12, 11 and 10
With version 5.0.0 (SDK version 7.5.3), Helpshift SDK has dropped support for iOS 9. If you wish to keep supporting iOS 9 devices for your apps, please read the KB Article to support Helpshift on older OS versions.
If you have a project with Xcode version prior to Xcode 9, you could use the build mentioned here.
Download the Cocos2d-x plugin for Helpshift
The zip file contains:
| v3.x | Folder containing the files for Cocos2dx version 3.x |
| v2.x | Folder containing the files for Cocos2dx version 2.x |
Adding the Helpshift iOS plugin
- Unzip the package, add the contents of the
ios/Classesfolder into your Xcode project. - From
ios/sdkfolder drag & dropHelpshift.xcframeworkinto the Frameworks, Libraries and Embedded content in the General section of your Xcode project. - If your app does not contain any swift code, set
Always Embed Swift Standard LibariesunderBuild Settingsto YES. - In the Build Settings of your Xcode project, add
-fmodulesand-fcxx-modulesflags under theOther C Flagssection in both Debug and Release. Be careful while adding these flags in Debug and Release, because if you override the default flags you might face build errors. TheOther C Flagssection would look this after adding mentioned flags: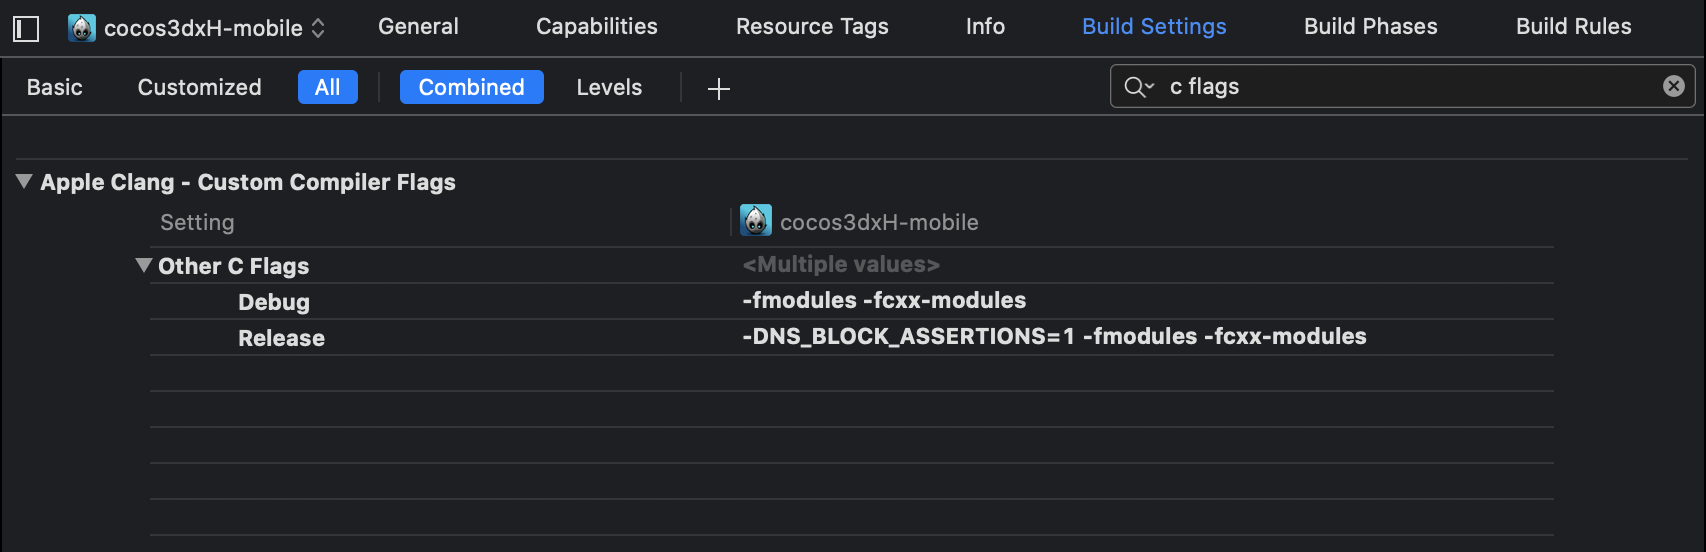
If you want to compile your Xcode project with bitcode enabled, please use Helpshift.framework present under 'ios/sdk/Bitcode' folder.
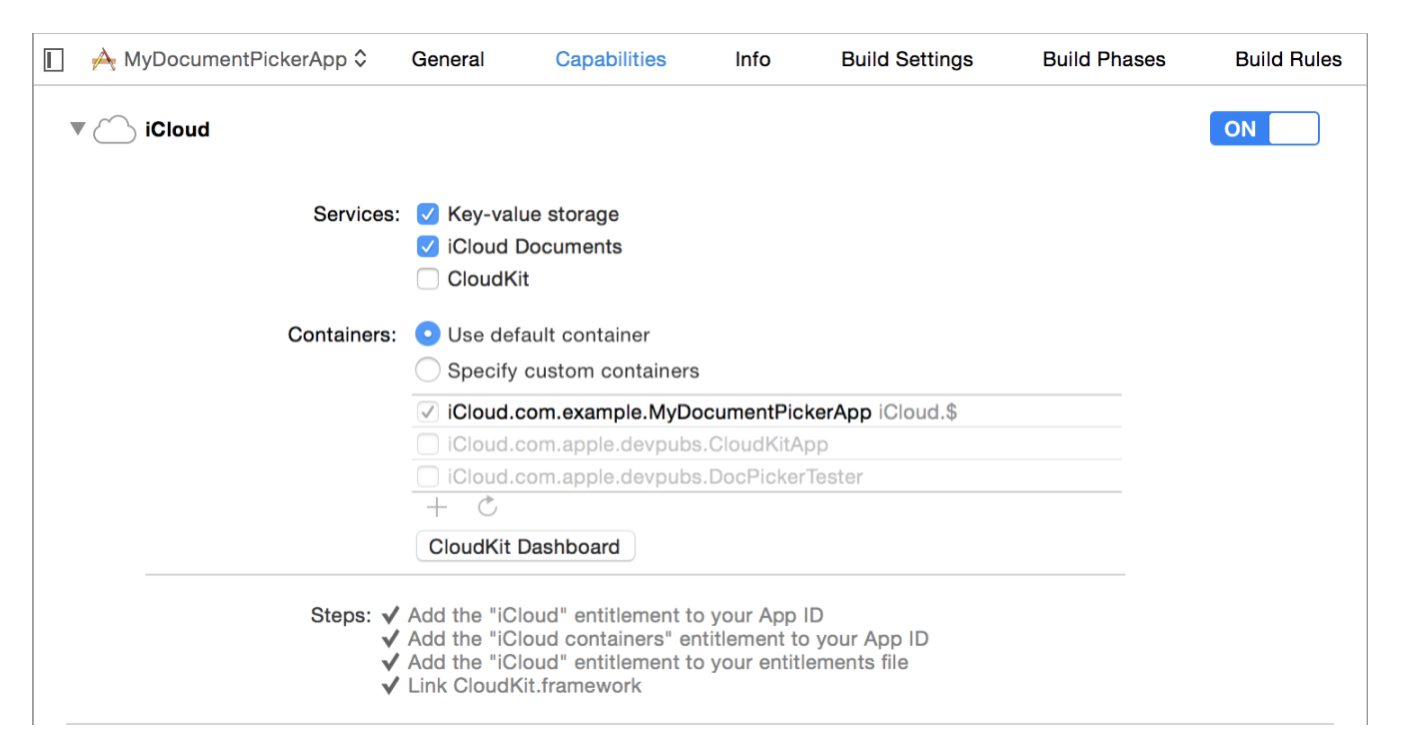
- With version 5.3.0, End-users will be able to send files such as pdf, video, etc. where before 5.3.0 end-users could only send images. For iOS 10 and below, to access files in the “Files” app of iOS, developers will need to add iCloud capability with iCloud Documents services enabled. For more info please refer the Prerequisites section here.
Add NSPhotoLibraryUsageDescription key in your application info plist file
If your app does not use this permission, you would need to add this key as well as description for the same. Not adding this key-description pair might cause app rejection.
Description text: “We need to access photos library to allow users manually pick images meant to be sent as attachment for help and support reasons.”
Note that this is just a suggested description. If you need localisations for the same, please Contact Us
Please replace all the old files with new files.
Initializing Helpshift in your App
Helpshift SDK uniquely identifies your App with the combination of:
| API Key | Your unique developer API Key. |
| Domain Name | Your Helpshift domain name. For example : foo.helpshift.com |
| App ID | A unique ID assigned to your app. |
To get the API Key, Domain Name and the App ID, navigate to Settings>SDK (for Developers) in your agent dashboard and scroll down to "Initializing Helpshift" section. 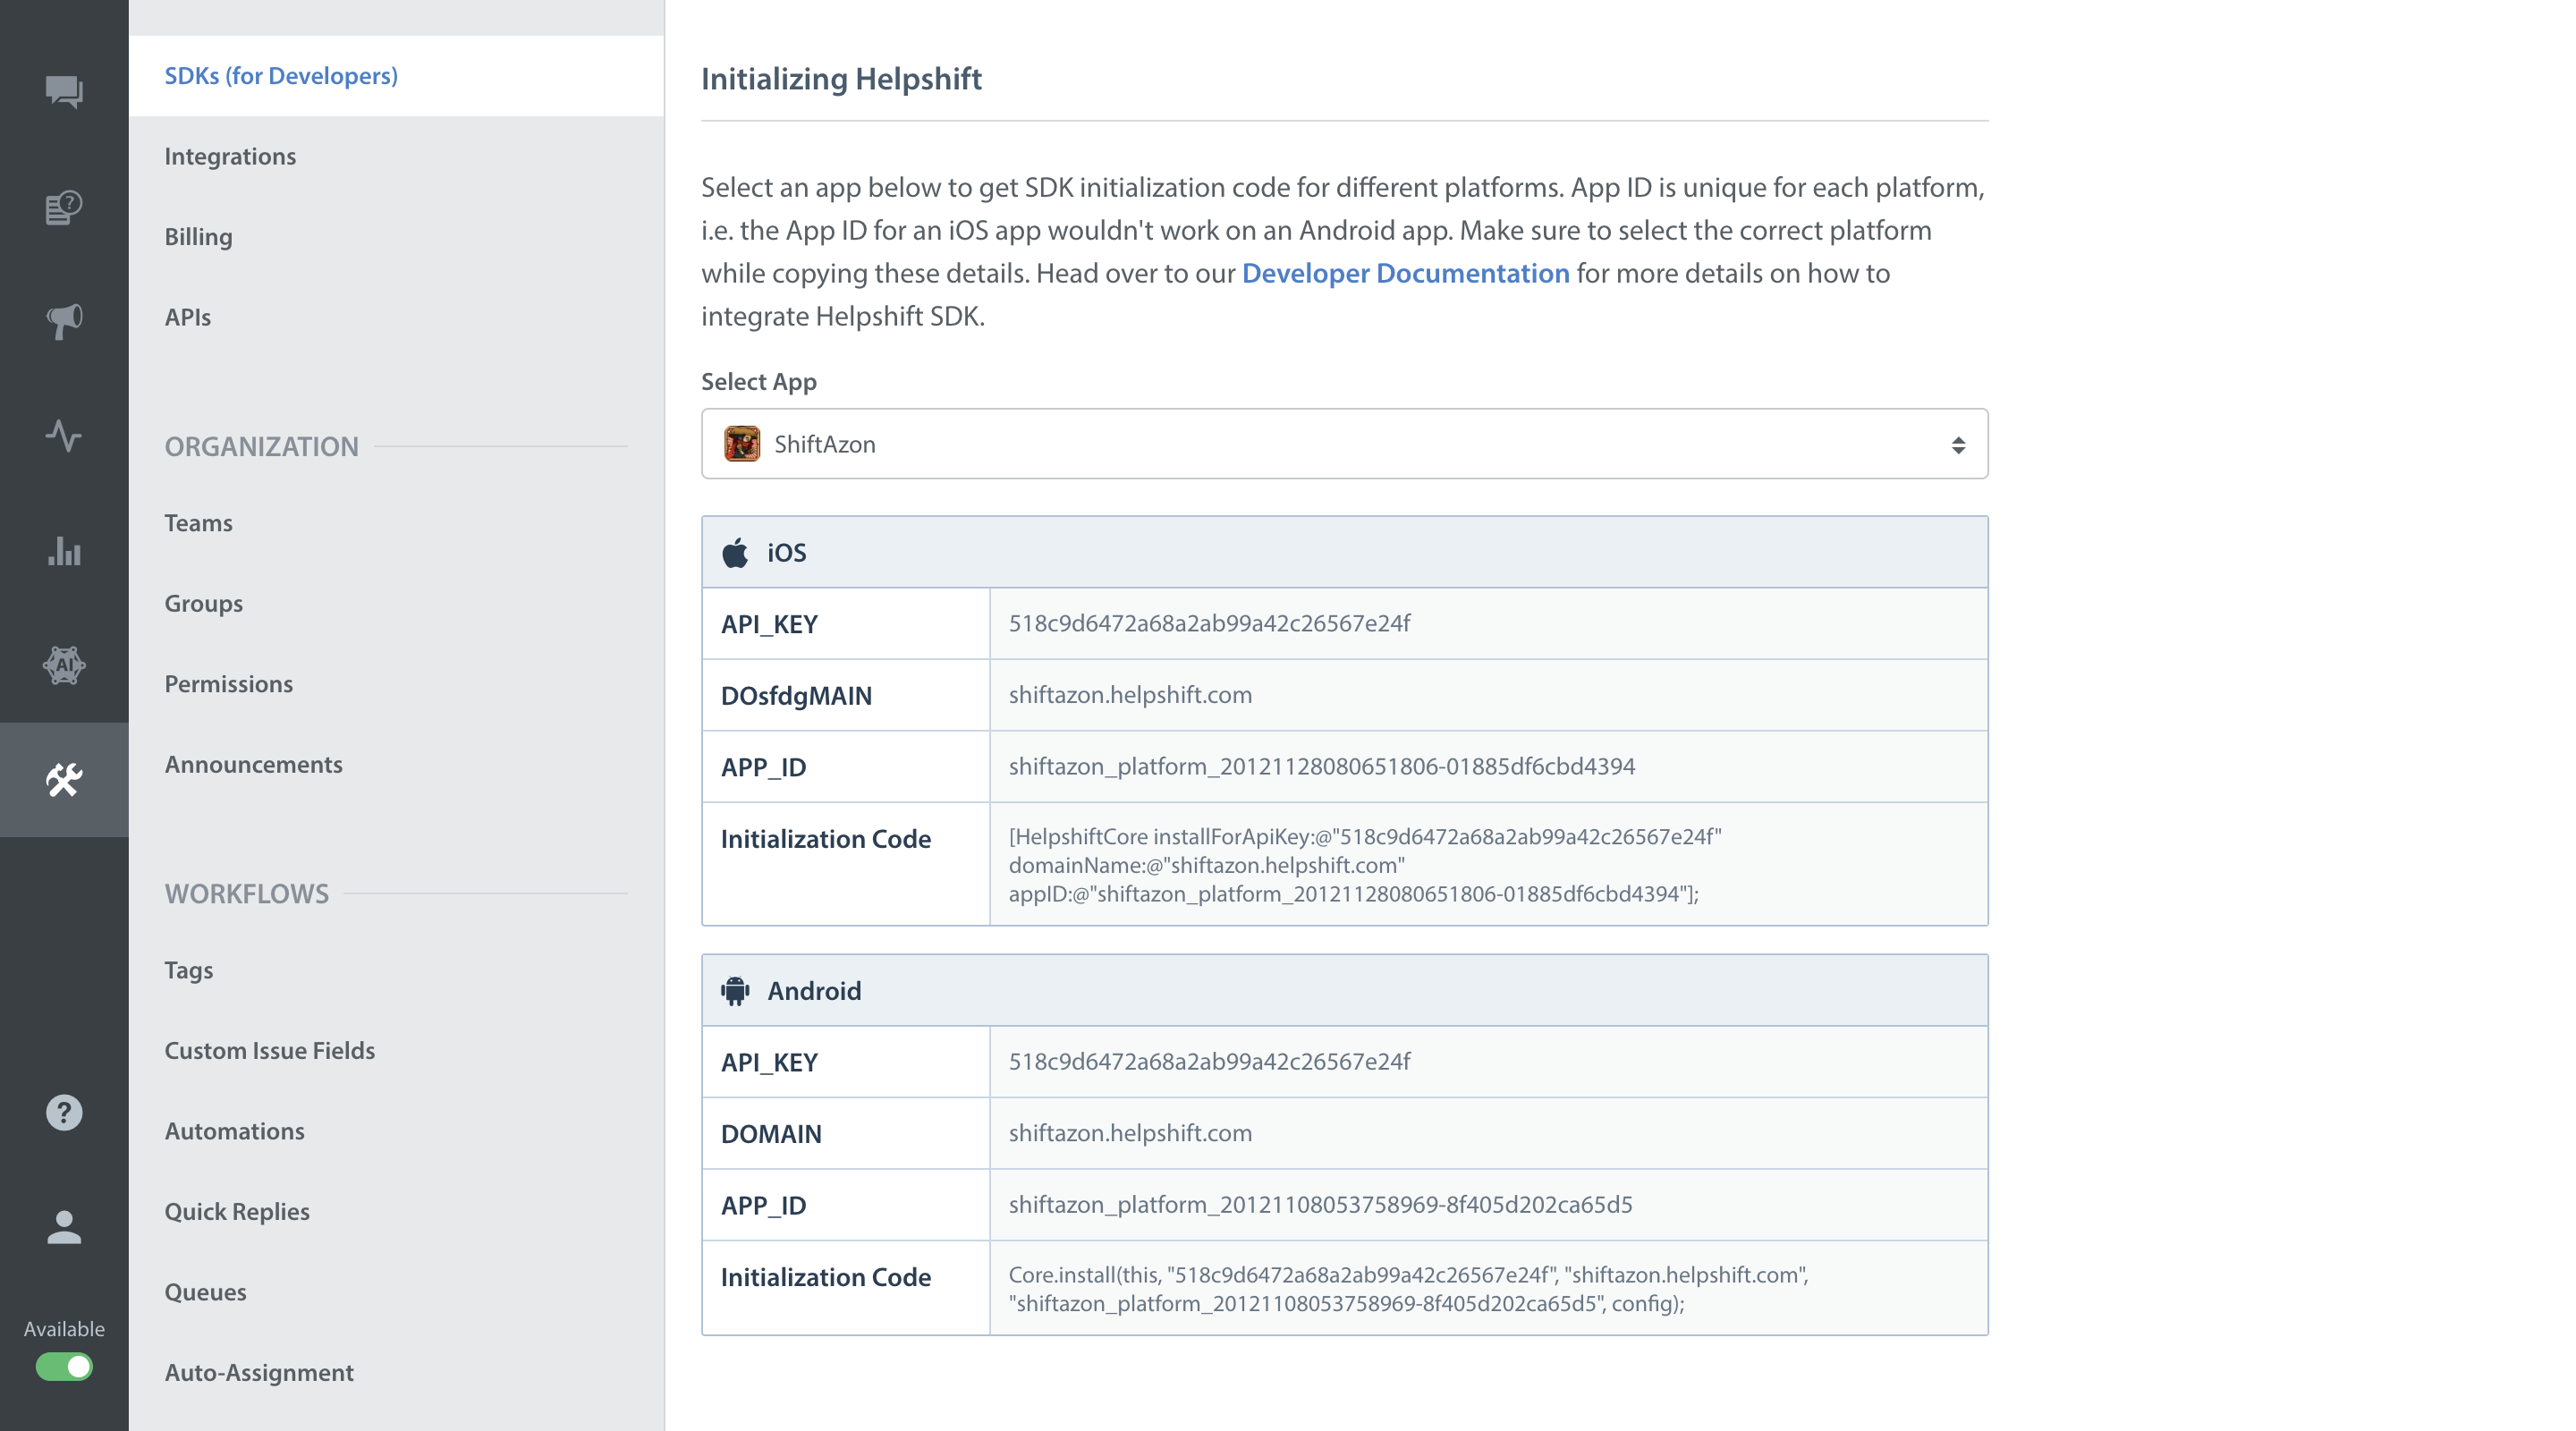
Select your App from the dropdown and copy the three tokens to be passed when initializing Helpshift.
Initialize Helpshift by including HelpshiftCocos2dx.h and
calling HelpshiftCocos2dx::install in the AppDelegate::applicationDidFinishLaunching() function of your AppDelegate.cpp:
    #include "HelpshiftCocos2dx.h"
    ...

    bool AppDelegate::applicationDidFinishLaunching() {

        HelpshiftCocos2dx::install("<YOUR_API_KEY>",
                                   "<YOUR_HELPSHIFT_DOMAIN>.helpshift.com",
                                   "<YOUR_APP_ID>");
        ...

    }
Start using Helpshift
Helpshift is now integrated in your app. You should now use the support APIs to present FAQ or conversation screens inside your app.
Run your app, and try starting a test conversation using the showConversation API call.
Then goto your Helpshift agent dashboard and reply to experience the in-app messaging.
Sample usage for FAQs and conversation APIs:
    // Presenting FAQs to your customers
    void GameSettingsScene::menuHelpCallback(CCObject* pSender)
    {
        HelpshiftCocos2dx::showFAQs();
    }

    // Starting a conversation with your customers
    void GameSettingsScene::menuConversationCallback(CCObject* pSender)
    {
        HelpshiftCocos2dx::showConversation();
    }